1. Open any image in PSE 9 Editor that you want to create reflections of. I picked this image as when i clicked this one, I felt there was a lake missing the the silhouette.

2. Click on Guided Edit tab>Fun Edits> Reflections.
3. Click on the first button : Add Reflection. Here is the output you see after that :

4. Click on the Eye dropper tool and select one of the colors to be filled as background for the reflection. For this image I chose the mustard color as you can see from the color swatch by clicking on one of the areas with this color on the image. And as I click Fill background, I see an output as follows :

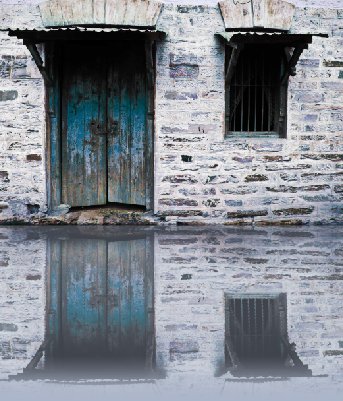
5. In the next step, you get an option to select either Floor, Glass or Water reflection. I chose Water Reflection for this particular image.
It will prompt for adding Ocean Ripple filter, followed by Motion blur to give some realistic effect.
I tried in 768 % of amount for Ocean ripple effect and 7 as distance in Motion blur.


7. Click on Add Distortion. I clicked it twice to make my reflection shorter that the actual image.

Rest of the area after shortening of reflection gets filled by your foreground color in the color swatch(the background you selected for reflection earlier)
8. Now crop this extra area in the next step using the next button Crop.
9. Once cropped you can add gradient to give more realistic look to your image. here is my final output.

If you are not satisfied with the gradient applied with this button, you may go to full edit and select the top most layer, edit the gradient itself choosing gradient tool and selecting Edit button from top bar.
One more example of the reflection created using this feature :


Is this possible in PSE8 or do I need to run out NOW to get PSE9 cause I LOVE this?
ReplyDelete
DeleteExcellent collection thanks for share this. Thank you for sharing.
Image Work India
Clipping Path Service
Photo Retouching Service
Remove Background Service Provider
Color Correction Service
Ecommerce Photo Editing Service
Ghost Mannequin Service
Image Masking Service
Jewelry Retouching Service
Shadow Creation Service
This comment has been removed by the author.
ReplyDeleteIn PSE 8 also, you can get the reflections created. However it is quite easier in PSE 9. Just few button clicks in PSE9 replace the manual steps for creating reflections in PSE 8 like resizing canvas, inverting the image in a new layer, add ocean ripple filter, motion blur, gradient etc.
ReplyDeleteHowever in PSE 9, it is too simple as it is a part of the new fun edit features. So everything is taken care of by few buttons in the workflow.
I am really loving PSE 9 for my editing. Lots of other additions like layer masks, style match, fun edits etc. In my personal opinion, it is worth buying :-)
I's this thing possible in PSE 7? I think it is really cool but but I haven't got that reflection guide...
ReplyDeleteGreat tutorial and techniques well explained.Thanks for sharing…
ReplyDeleteWe are providing Clipping Path
What a nice tutorial . Thanks for sharing.
ReplyDeleteThis is very nice post. It is also very helpful for us. I have been searching types of posts. Some days ago I read an article about post. But this better than post.
ReplyDeleteServices
• Photoshop Clipping Path Service
• Neck joint s invisible mannequin service
• 360° products images editing
• Photoshop shadow service
• Raster to Vector (R2V) Conversion
• Advertising Design
• multiple clipping path or color mask service
• Photoshop Image Masking Service
• Remove The Backgrounds
• photoshop color correction service
• Photo retouching service
• Photo restoration service
• Isolating image service
• photoshop cutout service
• I Image cleaning photo dust removal service
• clipping mask illustrator
• Photoshop Image manipulation services
• Photo cropping /Resizing service
• Image Editing Service
• Photoshop layer mask service.
ReplyDeleteThanks a bunch for your post. Really enjoyed that!!
Image Work India
Clipping Path Service
Photo Retouching Service
Remove Background Service Provider
Color Correction Service
Ecommerce Photo Editing Service
Ghost Mannequin Service
Image Masking Service
Jewelry Retouching Service
Shadow Creation Service
Great tutorial and techniques well explained.Thanks for sharing.
ReplyDeleteVisit our web: https://www.orbitgraphics.com/color-correction/
Packers And Movers Bangalore to Howrah
ReplyDeletePackers And Movers Bangalore to Siliguri
Packers And Movers Bangalore to Jamnagar
Excellent Post...I must thank you for this informative news...
ReplyDeleteLocal Packers And Movers Bangalore