Showing posts with label Guided Edit. Show all posts

Tuesday, October 23, 2012

What's new in the new version of Adobe Photoshop Elements 11?

There is alot new and exciting in the new version of Elements.
I thought to brief the set of these new features before I get onto sharing more tutorials on them.

Elements Organizer 11

The new version of Elements Organizer offers alot of usability improvements along with new features and new UI. The top level things you would notice when you launch the new version may be:

1. Better UI and  simplicity in workflows from previous versions. As most of us remember our pictures though the people in them, or the place where they were shot or the events associated them, the new Organizer is built on this concept and provides an easy way to organize the media by bringing in the different views that are: People, Places and Events and provides an immersive experience organizing your media.

Here is the quick preview of the new Elements Organizer 11

Elements Organizer 11 UI
Elements Organizer 11


2. The new version allows media to be placed on Google maps and hence allowing organization through the Places. It's the first time ever Elements has integrated the Google maps.


3. Import to and Export from Adobe Revel: Media from Organizer catalog can interact with the Adobe Revel. So one can access the media stored on various devices like iPad, MAC and other machines etc in your Organizer catalog. Similarly export the media to your Adobe revel account from the Organizer catalog.


4. Auto suggestion of Events based on media timestamp for quick organization.


5. Auto organization through Flat folders. Alot of us do not want to spend alot of time creating albums and we generally tend to associate our media with the physical location on the disk and hence are more comfortable with using folders. Previous versions of Organizer lacked an ability to show the list of that folders only that have media imported in the catalog. Hence using folder view in Organizer was cumbersome as it used the get the complete folder hierarchy even if not needed. This version gives a quick access to your managed folders(from where media has been imported) and the tree as well if required.


6. Faster response with larger catalogs as compared to previous versions. There has been improvement in performance of launch of application, folder view(trememndously), and a few other areas like tagging, albums, full screen view etc.


Elements Editor 11 

A lot of new exciting features to give a try that includes:
1. New enhanced and simpler UI. Here is a screen that captures the new UI of Editor:
Elements Editor 11


2. New Guided Edits like high key and low key effects, Vignette effect.
Some examples with Before/After using these features:

Before applying High Key effect in PSE11
Before High Key applied
After applying High Key effect in PSE11
After High key applied

Before applying Low Key effect in PSE11
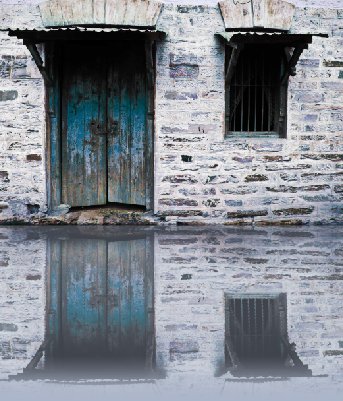
Before Low key applied
After Low key applied


3. Enhancements in "Refine Edge" feature allowing more precise and natural selections for cases like selecting hair etc.


Refine edge

4. Some new filters that include Comic filter. An example output of comic filter:

Comic Filter in PSE 11

5. Allows to add new effects/actions easily from other websites and blogs which allows you to create more creative content.


I hope you would find this summary of the new Elements version useful. I will soon share more about these in detail.

Tuesday, December 6, 2011

How to create picture stacks using PSE10?

The following two pictures illustrates the "Picture Stack" effect available in PSE10.

Original image
After Picture stack effect was added


This new feature in PSE 10 allows you to get this effect in a couple of minutes<probably less than that>.

Here are the steps :

1. Open the source image in Editor.
2. Go to Guided Edits
3. In the Photo Play category, select "Picture Stack"

2nd option in the category.


4. The next screen appears showing three steps :

In first step, you can choose the number of pictures in the stack you would like to see. The options are 4, 8, 12.

Once you select that, you can select border width of each photo frame. Teh three options are : Small, Medium and large.

The third ioption allows you to fill the background areas which are shown behind the frames with a solid color or gradient.

In these three clicks your output is ready.


However you may tweak the results like rotating any picture stack or moving it to a different orientation etc in the Full edit.

Select the Move tool in full edit and use it for moving any picture stack to a different position and commit the operation.


Once commited, the result would appear as shown :

Final result

Let me know if you find this useful!

Tuesday, April 5, 2011

How to add Saturated Film Effect to any photo using PSE9?


1. Open an image in PSE Editor.

2. Go to Guided Edits and click on Saturated Slide Film Effect under Photographic Effects.


3. Click on Apply button. It can be applied multiple times depending on the extent of the effect you are looking for.

Here are my initial and final images:


Initial image 
 

Final Image


Monday, April 4, 2011

How to quickly add vignette to a photo using PSE 9?

There are different ways in which you can add vignette to a photo. However when you are looking for the quickest(single step) and easiest way to do it, you may do the following.

1. Open the image in Editor. This is the image I opened.


2. Go to Guided Edit by selecting the Guided tab in the right Edit pane. From the guided pane, choose Lomo Camera Effect under Fun Edits.   


Click on Apply Vignette button <skipping the first Cross Process Image button.


Here are my initial and final images :


If you want more vignette, you may press the same button twice or thrice as per your need.

Monday, September 27, 2010

How to create subtle reflections using PSE 9?

It's so easy and cool to create reflections using PSE 9. It is one of the new guided edit features which is easy to follow with the instructions laid through the workflow. I am also following the steps described in the workflow to demonstrate the creation of a reflection :

1. Open any image in PSE 9 Editor that you want to create reflections of. I picked this image as when i clicked this one, I felt there was a lake missing the the silhouette.


2. Click on Guided Edit tab>Fun Edits> Reflections.

3. Click on the first button : Add Reflection. Here is the output you see after that :


4. Click on the Eye dropper tool and select one of the colors to be filled as background for the reflection. For this image I chose the mustard color as you can see from the color swatch by clicking on one of the areas with this color on the image. And as I click Fill background, I see an output as follows :


5. In the next step, you get an option to select either Floor, Glass or Water reflection. I chose Water Reflection for this particular image.

It will prompt for adding Ocean Ripple filter, followed by Motion blur to give some realistic effect.
I tried in 768 % of amount for Ocean ripple effect and 7 as distance in Motion blur.


6. Adjust the Reflection intensity as per your needs. I increased it from 80 to 90.


7. Click on Add Distortion. I clicked it twice to make my reflection shorter that the actual image.


Rest of the area after shortening of reflection gets filled by your foreground color in the color swatch(the background you selected for reflection earlier)

8. Now crop this extra area in the next step using the next button Crop.

9. Once cropped you can add gradient to give more realistic look to your image. here is my final output.


If you are not satisfied with the gradient applied with this button, you may go to full edit and select the top most layer, edit the gradient itself choosing gradient tool and selecting Edit button from top bar.

One more example of the reflection created using this feature :