Showing posts with label effects. Show all posts

Tuesday, December 6, 2011

How to create picture stacks using PSE10?

The following two pictures illustrates the "Picture Stack" effect available in PSE10.

Original image
After Picture stack effect was added


This new feature in PSE 10 allows you to get this effect in a couple of minutes<probably less than that>.

Here are the steps :

1. Open the source image in Editor.
2. Go to Guided Edits
3. In the Photo Play category, select "Picture Stack"

2nd option in the category.


4. The next screen appears showing three steps :

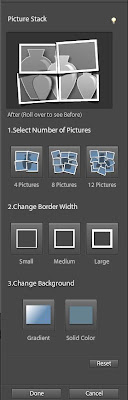
In first step, you can choose the number of pictures in the stack you would like to see. The options are 4, 8, 12.

Once you select that, you can select border width of each photo frame. Teh three options are : Small, Medium and large.

The third ioption allows you to fill the background areas which are shown behind the frames with a solid color or gradient.

In these three clicks your output is ready.


However you may tweak the results like rotating any picture stack or moving it to a different orientation etc in the Full edit.

Select the Move tool in full edit and use it for moving any picture stack to a different position and commit the operation.


Once commited, the result would appear as shown :

Final result

Let me know if you find this useful!
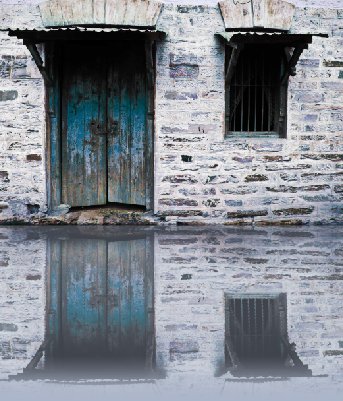
Tuesday, April 5, 2011

How to add Saturated Film Effect to any photo using PSE9?


1. Open an image in PSE Editor.

2. Go to Guided Edits and click on Saturated Slide Film Effect under Photographic Effects.


3. Click on Apply button. It can be applied multiple times depending on the extent of the effect you are looking for.

Here are my initial and final images:


Initial image 
 

Final Image


Tuesday, October 26, 2010

How to create stitching or embroidery text effect using PSE?

1. Open a blank document in PSE. Now select pattern stamp tool and increase the radius of the brush such that it covers the whole document.

2. From the Pattern Picker in top bar, select the pattern Denim and stamp it over the document so that the whole document now is painted with Denim texture.


After Stamping, it looks like this :


3. Now select Text tool from left toolbar and write some text as shown. Choose the color you like. I chose Stencil Std font style from font picker combo box in top bar and pink color from the color picker.


4.  Now we will create Stitch brush. For this open a new file from File>New>Blank with default background selected. Now choose brush tool from tool bar with black color selected. Make the radius of brush around 9px with hard brush type selected in the top bar options.

Now put a dot and press shift to create a small slant straight line. Similarly create another such that you have drawn V-shape as shown. Once you are done, go to Edit> Define Brush


It asks to name the brush. Name the brush as Stitch.


5. Once you are done, select the previous file we were editing from the project bin. Select the brush tool and the brush style as Stitch from the Brush combo box in the top bar. Create a new blank layer from layer menu and name the layer as "Stich".


Now on the edges of the text, start stamping the brush as shown. Please note we are stamping only along the horizontol lines as shown.


6. For vertical lines rotate the file by 90 degrees from Image>Rotate menu and complete the bruh stamping along the vertical lines which now appear as horizontal plane after rotate.


Once done rotate the image back.

7. Now select the Stitch Layer and go to Enhance>Adjust Sharpness. Increase the amount and radius as necessary.


Click Ok.

8.  Now keeping the Stitch layer selected, Go to Enhance>Adjust color>Replace Color. Select the color of the stitching or embroidery if you dont like the black stitching. I changed it to off white from black.


9. Once done, keeping the same above layer selected, go to Layer>Layer Style. Add Bevel to it(approx 9px in size).


10. Click Ok. Here is how your embroidered/stitched style look like :


Hope you find this tutorial helpful !

Monday, September 27, 2010

How to create subtle reflections using PSE 9?

It's so easy and cool to create reflections using PSE 9. It is one of the new guided edit features which is easy to follow with the instructions laid through the workflow. I am also following the steps described in the workflow to demonstrate the creation of a reflection :

1. Open any image in PSE 9 Editor that you want to create reflections of. I picked this image as when i clicked this one, I felt there was a lake missing the the silhouette.


2. Click on Guided Edit tab>Fun Edits> Reflections.

3. Click on the first button : Add Reflection. Here is the output you see after that :


4. Click on the Eye dropper tool and select one of the colors to be filled as background for the reflection. For this image I chose the mustard color as you can see from the color swatch by clicking on one of the areas with this color on the image. And as I click Fill background, I see an output as follows :


5. In the next step, you get an option to select either Floor, Glass or Water reflection. I chose Water Reflection for this particular image.

It will prompt for adding Ocean Ripple filter, followed by Motion blur to give some realistic effect.
I tried in 768 % of amount for Ocean ripple effect and 7 as distance in Motion blur.


6. Adjust the Reflection intensity as per your needs. I increased it from 80 to 90.


7. Click on Add Distortion. I clicked it twice to make my reflection shorter that the actual image.


Rest of the area after shortening of reflection gets filled by your foreground color in the color swatch(the background you selected for reflection earlier)

8. Now crop this extra area in the next step using the next button Crop.

9. Once cropped you can add gradient to give more realistic look to your image. here is my final output.


If you are not satisfied with the gradient applied with this button, you may go to full edit and select the top most layer, edit the gradient itself choosing gradient tool and selecting Edit button from top bar.

One more example of the reflection created using this feature :


Thursday, September 23, 2010

Photomerge Style Match in PSE 9?

It might have had happened to you when you have gone to shoot a sunset scene but unfortunately you got haze or clouds instead.

There is a cool feature in PSE 9 called Photomerge Style Match. Using this feature, you can match the style of any photo and transfer that style to your picture. For example if I had shot a sunset one day at some place X and I wished if I could have a similar shot on place Y. But if for some reasons I could not get, PSE 9 will help me. I can give the same sunset effect to my second image in a simple steps using this feature.

So here was my picture that I took on a foggy day. The image looks very normal and unattractive. 


1. After opening the image in Editor, select New> Photomerge Style Match.


2. A new bin appears adjacent to project bin at the bottom called Style/bin. Style bin consists of few sample images as shown that can be used as source images to transfer their style to the your photo. You may add your own style images by clicking on the green button in the style bin.


3. As you double click or drag any of the photos from the style bin to the blank placeholder above the project bin, the style will get applied to the image as shown with some default settings. I selected the default Sunset source image already existing in the style bin.


4. Now you can check the checkbox Transfer Tones to see how the image looks after the tones are transfered. You can play around with Style intensityStyle ClarityEnhance DetailsSoften stroke edges sliders to see the effect on your image.


The effects can come be really compelling if you try Style painter and Style Eraser tool buttons with different Opacity values( Opacity slider present on top tool bar) over different parts of image. So you may choose to erase style at some parts of image with 50% intensity while at other parts you may want to keep 100% of the effect.

Here is my final image after trying Style painter and Style Eraser with different Opacities at different parts of image :


Wednesday, September 22, 2010

How to create Object Out of Bounds image using PSE 9?

I just installed PSE 9 and found some great features. This is one of the coolest additions. I had created the same effect using PSE 8 as well @ http://photoshopelementstips.blogspot.com/2010/06/how-to-create-object-out-of-bounds.html. However, it is damn quick and easy in PSE 9. I am impressed by this new addition. Here is my first Object Out of Bounds image using PSE 9.

1. Open an image in PSE 9 Editor.
2. Go to Guided Edit mode clicking the sub- tab in Edit pane. Scroll down and select Object Out of Bounds under Fun Edits.

3. Click on Add a frame button


4. Drag the corners of the frame shown on the image such that some part of the object lies inside the frame. Now adjust the perspective of the frame by clicking Alt+Control+Shift and dragging the corners of the frame to give it a 3 D look.


5. Now Click on the commit button shown with the image(the green button in the widget  ) to commit your operation. It is shown the second time as well. This time it is shown to commit the width of the frame. So one may adjust it as per the needs and click the green commit button again.

The output appears as follows :


6. Now select the Quick selection brush from the panel on left and select the area outside the frame. Also please remember to keep some area inside the frame also selected which is adjoining the area selected outside your frame(please see the image below). You may use the + and - brushes(from top tool bar options) to add and subtract selections. Also you may use the zoom tool on left toolbar to make the selection precisely. shortcuts [ or ] may be used for increasing and decreasing the brush size.


7. Now Click on the button Create Out of Bounds in the right panel.


This is how it appears after that :


 Since my background was white, the frame is not visible. However other wise it looks prominent.

8. Now add a shadow using any of the buttons Small, Medium or Large buttons as per your needs.


9. Last step is to add gradient clicking on the button provided below the above options.


You may customize your gradient from the various options shown above.

Here are my initial and final images :


Friday, September 17, 2010

How to create flames using PSE 8?

Here is my first attempt in creating flames :

1. Open a blank document with black background.

2. Create a new blank layer and paint the lower bottom area as white with brush tool as shown below


3. Now rotate it right by 90 from Image>Rotate > 90 Right.

5. Filter> Stylize> Wind . Repeat it thrice using Control+F to achieve the following result


Rotate it back by 90 Left from Image>Rotate > 90 Left.

6. Now create another blank layer and use hard  brush to paint the area with red, orange and yellow as shown in the figure below. Select topmost layer and go to Filter>Gaussian Blur. Set the radius to 8. Here is how it looks like after this step.


7.  And now change the blending mode of this layer to Overlay (from Blending modes dropdown in layer palette). The output looks as shown below :


8. Now select the layer below(with wind effect, 2nd layer from bottom) and select Smudge tool from the left toolbar and start smudging it from bottom through up. It looks like this :


9. Now select the gradient tool and click on Edit button on topbar to define three gradient colors as shown in figure. Move the color stops such that left most is yello, middle stop is at Orange and right most at Red.


10. Now select the topmost layer in the layer palette and strike the gradient from bottom to middle.


11. Now Control+click on  the middle layer(Wind layer) and go to Enhance> Adjust Color> Replace Color. Replace the white color with yellow by selecting respective colors from the color swatches in the dialog.


12. Click Ok and here is the final output which I got.