Showing posts with label layer masks. Show all posts

Tuesday, March 1, 2011

Creating Depth of Field using Adobe Photoshop Elements 9.0

Selecting the background and blurring it can just pop up your subject but does not give a sense of depth of field.

Following is the tutorial for bringing depth of field to your photos. It uses PSE 9 layer masks and gradient tool.

Original Photo

Final edited photo with Depth of field


Here are the steps to add DOF to any photo :

1. Open an image in PSE Editor.


 2. Press Control+J to create the copy of the background layer.

 3. Keeping the copy of the layer selected in the layers palette, go to Filter>Blur>Gaussian Blur to blur the layer such that the image looks blur to an extent of the maximum blurriness you would expect in your final photo.


4.   Now go to Layer>Layer mask>Reveal all. Also make sure that your color swatch in left tool bar has default colors selected as Black and white.


5. Now select the Gradient tool from left tool bar.


6. Stroke the gradient tool in the direction where you want to represent the depth of field. So in the image used in example depth of field goes from the point where the front cub is standing to the direction where second cub is sitting behind. So I moved the Gradient tool across the red path marked below.


7. Here is how my output looks after applying the gradient and my sharp background is blurred in proportion to the distance from the front subject.


Thursday, December 16, 2010

How to bring sheen to hair using Adobe Photoshop Elements?

The hair in the image below looks dull and lacks shine. In 3 easy steps one can add shine to the hair using PSE 9.


 1. Open the image to be edited in PSE 9 Editor. Create a duplicate copy of the background layer using Control+J or dragging the background layer to the new layer icon in the layers palette( 1st icon below the layers).

Select the background layer in the layers palette and click the new layer icon which is the first icon in the layers palette below the layers.

This is how the layers palette should now look like. There appears a blank layer between the background layer and the background copy.


2.  Now click the top background copy layer in the layers palette and press Control +G or select Layer>Create clipping mask.


See the top layer gets indented in the layers palette indicating that a clipping mask got created.

Change the blending mode of the blank middle layer to Linear Dodge(add). You can do this simpley by selecting the middle layer in the layers palette and changing the blending mode from Normal to Linear Dodge(add) from the combo box in the layers palette.

3. Now select the brush tool from tools bar. Keep the default colors in the color swatch(black and white as default).
Choose the brush size from top bar as 60px of soft mechanical brush type.

Change the Opacity of the brush to 20% from top bar. Remember if the hair color is not not dark as shown but some lighter color, reduce the opacity to half this value(around 10%).


Keeping middle layer selected, start brushing over the area of the hair you want shine to appear.

Here is how my initial and final images look :                 

Initial Image


Final Image

Thursday, September 23, 2010

How to use Layer Masks for precise selections in PSE 9?

There is a wonderful addition amongst the rich set of features in PSE 9 - Layer masks. This was something which was missing in PSE 8. It is a wonderful tool which helps in achieving a lot of good results in different editing operations. This tool is specially helpful for people like me who aren't that precise in selection tools like lasso,quick selection etc. However, are more comfortable with the paint brush and eraser.

In this tutorial, I will be using Layer Masks to move one object from one image and place it on other precisely without using any of the other selection tools in PSE like Lasso, quick selection etc.

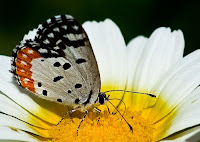
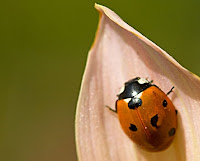
I have the following two pictures : one is butterfly on a white flower and other is a lady bug on a pink leaf. Now I want to place the lady bug from the second picture on the flower leaf of the first picture, next to the butterfly.


1. I opened both the images in PSE 9 Editor.

2. Now I keep the image of butterfly in display in the editing workspace.


Select the Move tool from the tools bar and drag the ladybug image from the project bin below over to the butterfly image in the workspace.


3. Now as you see in the image below, the lady bug image comes over the butterfly image occupying a lot of space. Also you would notice that there is a new layer formed in the layers palette which is that of the lady bug image.


Just drag one of the corners of the lady bug image inwards to reduce its size.


Now one can rotate the image of the lady bug by dragging the corner of the image keeping Control key pressed and revolving it through the corners like this.


Click the commit green button when you think that the orientation is correct.

4. Now select the lady bug layer in the layers palette and go to Layer> Layer Mask> Reveal All.


As you do this you would see that there is one white mask that got created in layers palette.

5. Now select the Brush tool from the tools bar and black color selected as foreground color in the color swatch (as shown below). Now brush over the rest of the area of the lady bug layer leaving just the lady bug. This will remove the pink and green background of the ladybug in the layer.


As you click and drag the mouse with the paint brush you would notice that some black color gets painted in the white mask in the layers palette.  And you would see the pink leaf disappearing.

In case you mistakingly paint any unwanted area or some extra area, you can correct it by changing the foreground color in the color swatch to white and paint over that area again. So you can keep switching between black and white foreground colors in the color swatch to correct your selection.


Also for best results, zoom the image to 200-300% and reduce the brush size when you brushing around the corners of the lady bug to get precision.


Once you are done, select zoom tool and right click -Fit to screen.


6. Now select the move tool again and move the lady bug over the white flower and change its orientation as per your needs. You may transform it using Control+Shift+Alt and dragging the corners.

Here is my final result ;


Layer Masks can be used in several other workflows like selective editing in a picture or applying filters to some part of the image etc.

Hope you would find it useful too.