Showing posts with label PSE 9. Show all posts

Wednesday, April 20, 2011

How to quickly make a perfect group shot from a couple of images?


It happens alot of times that while taking a group shot, there is atleast one person who is looking somewhere else. So we ask to pose for another shot. However now someone else from the group is not in perfect smile or moving his hands here or there.

Getting a perfect group shot is too simple using PSE.

1. Open the two group shots which are not so perfect and go to File>New> Photomerge Group Shot or Guided Edit > Photomerge> Group Shot

For example :


The above screen appears. Select the base image where most of the people appear perfect and drag it to the empty space on the right where as the source image at left.


If you see the above pictures you would notice that in right image(our base image) , the person on the left has his arm raised. While in the left image, the person at the back has his arms raised.

So we want to have one picture out of these two were none of the guys have their arms raised.

2. Select the pencil tool from right panel and create a selection like the one show below (V-Shaped), where I selected the person on left who appears fine.


As soon as you leave the mouse drag, you would see the results as shown :


But if you see closely, there is a problem in this result which is highlighted as shown below :

Problem highlighted in pink box

So the person highlighted in pink box is having another arm in the result image on right.

It is just one more step. Just select the eraser tool from right panel and rub over the arm area in the source i.e. left image and the extra arm disappears.


And here is my resultant image :)

Final image after applying Photomerge group shot

Saturday, April 16, 2011

How to remove an object from a scene and create background content to fill the hole using PSE9?

Is there a tool in PSE which can help you remove an object or a person from foreground of an image by filling it with the background content?

Yes, there is one which was introduced in PSE 9. So here are my initial and final images to show what this tutorial will help you achieve through this tutorial:


     Initial image


Final image


So in my source image above, I wanted to remove the girl from the temple and have just the building.

It may be achievable with clone tool, however it would really be a big time task.

For non-complex images, it may just take seconds to fix that photo using content aware spot healing by doing just a couple of dabs
.
However, I choose an image which is complex as we need to remove a person whose background is not consistent throughout. It has the dark area inside the gate, the gate boundaries, the sculptured wall, the ground with variations in textures and colors. And spot healing from previous versions of PSE might not work since it does not have that intelligence to create content from background and fill it with it.

1. Open the image in Editor.
2. Select Spot healing tool from the left tool bar. 


The spot healing brush properties in top properties bar


3. Now keeping "Content-Aware" option selected in Properties panel, a keeping brugh size of the area not very big(which can be incremented and decremented using ],[ keys), start brushing(dabbing) over the object you want to remove.

So here are some tips which I have learnt on using this tool again and again :


1. In the image above, for areas marked in red, I could use a bigger brush size without worrying much as the background behind the red mark is not very complex and is consistent, and I am not worried much as there are change in colors, no linear planes changing etc. So I can do this part quickly.


2. The areas marked in yellow are bit complicated as they have carvings on the wall. So would be good to start dabbing the brush with small size from the area near to the yellow area boundary in a linear manner. So if you see the carvings on the wall, they are horizontally linear. So it would be good if I start from the left near the boundary of the yellow area towards right horizonally.


3. The areas marked in blue(In L shape) is the area which should be taken care alittle meticulously since it has the frame of the door which has straight lines which need to be content created. So for this I reduced the brush size so that it did not cover the breadth of the frame and started from left such that the brush area includes the area of the existing frame(white frame area). However, this decision making may vary from image to image which would come to you as you try this tool a few times. For non-complex images, it may just take seconds to fix that photo using content aware spot healing and you may not have to do any such decision making. But for complex images, you might need a little thinking to get the best results.


4. For the area in purple, I used clone tool as it was quicker for that scenario. Spot healing content aware brushcould also have been used.

Here is my final result :


Hope this tutorial helps!!!


Tuesday, April 5, 2011

How to add Saturated Film Effect to any photo using PSE9?


1. Open an image in PSE Editor.

2. Go to Guided Edits and click on Saturated Slide Film Effect under Photographic Effects.


3. Click on Apply button. It can be applied multiple times depending on the extent of the effect you are looking for.

Here are my initial and final images:


Initial image 
 

Final Image


Monday, April 4, 2011

How to quickly add vignette to a photo using PSE 9?

There are different ways in which you can add vignette to a photo. However when you are looking for the quickest(single step) and easiest way to do it, you may do the following.

1. Open the image in Editor. This is the image I opened.


2. Go to Guided Edit by selecting the Guided tab in the right Edit pane. From the guided pane, choose Lomo Camera Effect under Fun Edits.   


Click on Apply Vignette button <skipping the first Cross Process Image button.


Here are my initial and final images :


If you want more vignette, you may press the same button twice or thrice as per your need.

Tuesday, March 1, 2011

Creating Depth of Field using Adobe Photoshop Elements 9.0

Selecting the background and blurring it can just pop up your subject but does not give a sense of depth of field.

Following is the tutorial for bringing depth of field to your photos. It uses PSE 9 layer masks and gradient tool.

Original Photo

Final edited photo with Depth of field


Here are the steps to add DOF to any photo :

1. Open an image in PSE Editor.


 2. Press Control+J to create the copy of the background layer.

 3. Keeping the copy of the layer selected in the layers palette, go to Filter>Blur>Gaussian Blur to blur the layer such that the image looks blur to an extent of the maximum blurriness you would expect in your final photo.


4.   Now go to Layer>Layer mask>Reveal all. Also make sure that your color swatch in left tool bar has default colors selected as Black and white.


5. Now select the Gradient tool from left tool bar.


6. Stroke the gradient tool in the direction where you want to represent the depth of field. So in the image used in example depth of field goes from the point where the front cub is standing to the direction where second cub is sitting behind. So I moved the Gradient tool across the red path marked below.


7. Here is how my output looks after applying the gradient and my sharp background is blurred in proportion to the distance from the front subject.


Sunday, December 26, 2010

Thinify nose of a portrait using Adobe Photoshop Elements


Thinifying nose takes just two minutes in PSE 9.

1. Select Magnetic Lasso tool from left tool bar. Make a selection around the nose. Right click the selection and select Layer via Copy to create a new layer of the selection.
2. Press Control+T for performing transformation. Move the left and right sqare boundaries inwards to thinify the nose as required.
4. Now select Spot Healing brush and brush away the distorted spots created around the nose in the last step.

Thursday, December 16, 2010

How to bring sheen to hair using Adobe Photoshop Elements?

The hair in the image below looks dull and lacks shine. In 3 easy steps one can add shine to the hair using PSE 9.


 1. Open the image to be edited in PSE 9 Editor. Create a duplicate copy of the background layer using Control+J or dragging the background layer to the new layer icon in the layers palette( 1st icon below the layers).

Select the background layer in the layers palette and click the new layer icon which is the first icon in the layers palette below the layers.

This is how the layers palette should now look like. There appears a blank layer between the background layer and the background copy.


2.  Now click the top background copy layer in the layers palette and press Control +G or select Layer>Create clipping mask.


See the top layer gets indented in the layers palette indicating that a clipping mask got created.

Change the blending mode of the blank middle layer to Linear Dodge(add). You can do this simpley by selecting the middle layer in the layers palette and changing the blending mode from Normal to Linear Dodge(add) from the combo box in the layers palette.

3. Now select the brush tool from tools bar. Keep the default colors in the color swatch(black and white as default).
Choose the brush size from top bar as 60px of soft mechanical brush type.

Change the Opacity of the brush to 20% from top bar. Remember if the hair color is not not dark as shown but some lighter color, reduce the opacity to half this value(around 10%).


Keeping middle layer selected, start brushing over the area of the hair you want shine to appear.

Here is how my initial and final images look :                 

Initial Image


Final Image

Thursday, November 11, 2010

How to train the quick selection tool for making better selections in PSE ?

Quick selection is a great tool for selecting objects in any image. It intelligently selects the object distinctly from the background by detecting the brightness, contrast and tonal changes along the objects and their backgrounds. It takes just a little mouse drag with in an object to select an background.

For example : for the image below I just dragged my mouse from point A to point B for selecting the whole apple instead of moving my mouse along the edges of the whole apple which we would require for other selection tools.


This is how my object was selected moving my mouse from point A to B (Please note I increased the brush size to 35 px from options bar after selecting the quick selection tool for making this selection) :


However in the above image, there is good contrast between the object to be selected and its background. So we did not need to train our quick selection tool. But for getting better results in minimum time when there is not much great color difference or contrast between our object and background, it is recommended that you train your quick selection tool.

So in an image like below, where there is not that great color contrast between yellow flower and its background, we would train our tool.

So if I move my quick selection tool from point A to B to select the yellow flower, here is what
I get as selected :


However I did not need this extra highlighted(green) part in my selection(as shown below) which was selected when I moved my mouse from point A to point B. But since there is a low contrast between the orange and the yellow here, this area too got selected.


So instead of selecting my flower in one go as shown above, I follow the steps below to get my needed selection :

1. Select a very small part of the yellow flower as shown after selecting Quick selection tool.


2. Now I will press Alt key and keeping it pressed, I click and drag my mouse over the area I did not want in the selection. So  I brush my mouse over the green highlighted region shown in the second last image.

I also notice that as soon as I click Alt key my mouse cursor changes from "+" to "-" as it tell what area not to select.

Once I am done with that I leave the Alt key back and again move my mouse from point A to B as I did earlier and here is how I get my desired selection :


So here I have trained my quick selection tool not to select what areas of contrast. So if I had the similar background around the whole flower, then I would just drag my mouse once along the boundaries of the flower to tell my tool about the low contrast areas which I do not want to select.

Also keep in mind that if you have a large and random objects to be selected then you should keep subtracting the wrong selections you make as you sweep and not to defer the subtraction task in the end. This trains my tool at every step of selection and tell it what "not" to selection as it goes ahead.


I hope you find this tutorial helpful!

Wednesday, November 3, 2010

Lasso selection tools in PSE

Photoshop Elements offers a plenty of ways to select any object and thus allow placing it over some other image or doing selective editing. However for a newbie, the different selection tools remain a mystery. It is initially difficult to understand when to use which tool. Through this tutorial, I will try to capture the use of the first set of selection tools which is the lasso group consisting of Lasso tool, Magnetic lasso tool and polygonal lasso tool. My subsequent tutorial will cover other selection tools as well.

Lasso tool 

Lasso tool is a free form selection tool which allows you to select any irregular shape by just mouse click and move the mouse over the edges of the object. The selection precision through this tool depends on how steady your hand movements are, along with the mouse sensitivity. So if your hand selection is steady and precise, you would get good results. Shortcut key for this tool is L.

This tool is present as highlighted in the toolbar image shown in the image on right.
As you start making the selection you would notice that it is hard to follow the thread edge of the lasso tool icon. So you can turn on your Caps lock key to make this icon appear as a normal cross hair icon which has a defined center.


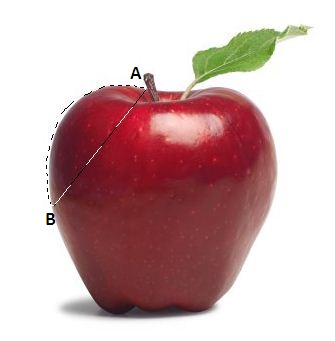
So once you open the image in Editor, you just need to click on this tool icon and get started with your selection. Once you click and move the mouse the selection boundary will start getting drawn. As soon as you release the mouse, the selection area get closed by a straight line between you initial and final points.


So as seen in the image on left. I started my selection from point A across the curve side of the apple. I released the mouse at point B. As soon as I released the mouse, a straight line closed the selection to have an area selected as shown in the image.


For making better and smooth selections, here are the additional options in the top options bar which are provided with this tool :


The Yellow highlighted part of the image has four icons :

1. New selection : This is selected by default. This is for making new selection. If a selection
is already made with this option is selected and you start a new selection, the old selection disappears.

2. Add to selection : If there is some selected area already and you want to add new area to the selection, click on this icon and start the new selection.

3. Subtract from selection : If your selection area has some parts which are un-required and were mistakingly selection, you can choose this option and start selecting the area you want to subtract from the existing selection.

4. Intersection of the selections : If you have an area selected already and you want to have a new selection which has some parts of existing selection with some new area as well, just select this option after you have an existing selection and start selecting the new area.

The Orange highlighted tools in the image above are for smoothing and refining your selection. If none of these options are used, the selection will have jagged edges. This tools are common to other selection tools as well.

1. Feather : This option has a text field in which you can specify the amount in pixels. The value range is from 0-250 px. The large the value, smoother the selection. This edge smoothing method causes the edges of selection to be blurred causing the smoothing of the edges. Hence this method is accompanied with loss of image details across the edges. If the blur is too high, loss of data will also be high.

The effect of feathering is inversely proportional to the resolution of image in DPI. So a higher DPI image will have lesser effect of feather as compared to same feather applied on lower DPI image. Actually the formula is simple. Since a higher DPI image has more pixels per inch hence a 2 px feather will not be that much visible. But in an image where pixel density is low, 2 px feather will be visible very clearly.

Please note that this feather value must be given in advance before making the selection else this option would not be honored. To give feather to an existing selection, you can select the Refine edge button which we shall discuss shortly.

2. Anti aliasing : Unlike Feather option, this edge smoothing option is lossless and subtle. If this check box is checked before making a selection, the jagged selection edges will e smoothened as you go along with your selection. Instead of blurring edges as in case of feathering, it instead adds some gray pixel around the jagged selection boundary making it smooth and giving the squared pixel a curvy effect. So this is highly useful option which one should check with any of the selection tools.
This option is used for distortion less smoothing of edges.

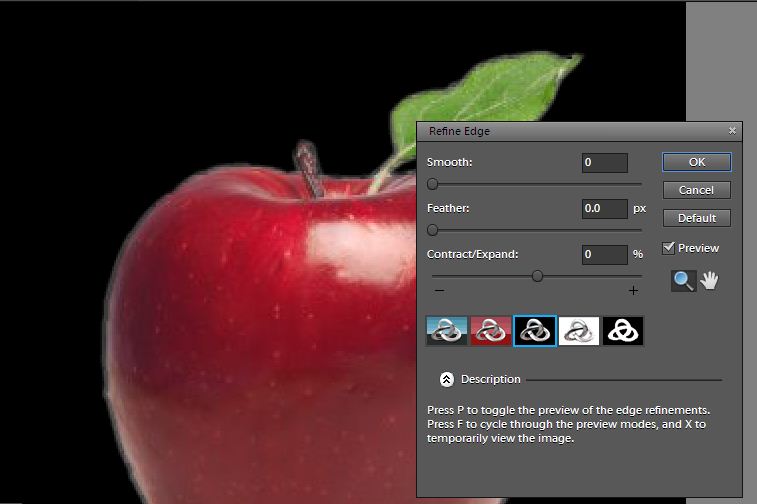
3. Refine Edges : This is the next option in the options bar. As you click the button, you are shown with the following dialog. These options are used to refine the edges once you have already made the selection. The button remains disabled before any selection is present.


The options highlighted in green box are the sliders to refine the edges of the selection. The options in yellow box are for viewing the smoothing effect of the selection in the selected background or mask. The options in purple are for Zooming in, preview and move the image to view a specific area of the image.

You can select any of the icons in the yellow box to view your selection in different backgrounds or if you want to view it as a mask. You can either select lack, red or white background or view the selection as a mask. These options enable you look closely to judge how much refinements are still required.
I have chosen "On Black" which is third icon in the yellow box.


As from the above image, I can make out that my selection boundaries are very jagged, so i need to refine them. So I use the following options to achieve that :

1. The Smooth slider smoothen the edges without rounding the corners. I use it quite often as I do not visualize much destruction with this option. For this image I gave the value around 5.

2. Feather slider is same as the feather text box discussed earlier i.e. it adds the blur to refine the edges. The difference is that using this slider you can add feathering after you have made your selection unlike the option discussed above.

I added a feather of 0.8 for this selection.

3. Contract/Expand slider shrinks or expands your selection boundaries in parallel to your selection edges. You can use the slider to expand or shrink your selection until your selection boundary meets the edges of the object.

For this image, I contacted it by a value of -11.


Magnetic Lasso tool


It is an intelligent lasso tool(free form selection) with edge detecting capability. So it reads the color brightness change information along the edges and then the tool keeps sticking to the edges automatically as you move the mouse.
As you click over any edge of the object and start moving the mouse across the edge, it automatically detects your edges and follow the edges precisely as you move the mouse making the selection quicker.

It keeps adding anchoring points to the selection across as you move the mouse. In case if any inappropriate anchor point gets introduced in you selection, you can undo each anchor point by pressing Backspace key. Esc key will completely remove the selection.


To switch between different Lasso tools, you can press Shift+L. Same tip for this tool as well. You should turn on Caps lock key while making selection as it brings the cross hair icon for the selection instead of the thread part of the tool icon which is difficult to follow while making selection.

For a closed selection one should double click in the end where start and end points meet. With a single click, one can start the selection and move across the edges so that the selection line is drawn automatically with this tool and anchor points are also drawn. One can also introduce more anchor points to give more sharper selection by single clicking in between while moving mouse.

As shown in the image above, the points on the selection curve are the anchor points which define the selection.

Here are the options for magnetic lasso tool in the options bar :


The options highlighted in yellow box are same as described above for Lasso tool which are there to mark a new selection, add to an existing selection, subtract from an existing selection or get the intersection area of two selections.
The options marked in Orange box are there to control the smoothing of the selection and to decide how fast and accurate we can make our selection to be. The options Feather and Anti-aliasing are same as we described in Lasso tool. 

Width defines the radius of the cross hair cursor. The bigger the radius, the faster is the selection. However if the object to be selected and the background have lower contrast, it is advisable to keep the radius small for magnetic lasso tool to detect the edges efficiently. The value of this radius ranges from 0-256 px.

Contrast value in the Orange highlighted box decides how much sensitive our selection brush is with the contrast between our object and the background. So for low contrast between the object and the background, we should keep the percentage value of Contrast field to be low which would tell out tool to intelligently understand this input and work precisely for detecting edges. However if contrast is high, we should keep this value high to tell our tool to work faster as it does not have to make any deep calculations for detecting edges.

The text field Frequency defines the density of the anchor points. So for a sharper and precise selection, more anchor points can be drawn. The range of this option is 0-100. So if I specify the value as 100, here is how my selection would appear :


The value of Frequency should not be very high as it starts giving very jagged selection. Default value is 57 which works almost appropriately.

The tool in the green highlighted box is to control the pen pressure on the tablet (I have not used this option as I do not have a tablet).

Once you have started the selection using this tool, you may not be able to go to the options bar and change the values as required since it would disturb the selection. So one has to use the shortcuts to dynamically change the options in the options bar. (,) comma and (.) period are used to increase and decrease contrasts.

Magnetic lasso tool works very well most of the time when there are good contrasts between the object and the backgrounds. In case of contrast as well, it works well if the above parameters are set accordingly for low contrast like low width and low contrast value. However in cases when there are selections like selecting hair or fur or any specific colored objects etc where other tools work better which we would cover in other tutorials.

Polygonal Lasso Tool


This tool can also be found in the Lasso tool flyout menu below Magnetic Lasso tool. Once can select Shift+L to switch between this tool and other Lasso tool.

It is also for free form selection of any object or area when straight line edges are required. You can start your selection with single click which gives a start point, second click draws the straight line selection line which in turn connects to the third click with the other selection line.

To give an example of where I used it in one of the demos is when I had to clone the hay bundle as shown in the polygonal selection to its left.


I created a duplicate layer of the image(Control+J), then selected the grass bundle with the polygonal lasso tool as shown and then using the Move tool from the toolbar and move it to the area whre I need the clone.


As you can see from the image above, I have been able to clone the area as required.

Once you have made the selection using any of the selection tools, what else can you do with the selection?

As you can see from the image above, I have been able to clone the area as required.

- One can select "Layer via Copy" and create a separate layer of the object selected and edit that layer as required. One can hence independently edit this object layer as required. Like converting to black and white or enhancing colors of the objects etc.
- One can right click and "Select inverse" to select the areas apart from current selection and create a "Layer via Copy" from right click to create a separate layer of the background and edit the background as required. Like blurring the background or painting the background with a gradient etc.
- Create a copy of the background image. Select the area using any tool and use move tool to move this area to somewhere else in this image or some other opened image in Editor.
- Transform the selection via right click options and place it at necessary location in the same or the different image.