2. From the Pattern Picker in top bar, select the pattern Denim and stamp it over the document so that the whole document now is painted with Denim texture.

After Stamping, it looks like this :

3. Now select Text tool from left toolbar and write some text as shown. Choose the color you like. I chose Stencil Std font style from font picker combo box in top bar and pink color from the color picker.

Now put a dot and press shift to create a small slant straight line. Similarly create another such that you have drawn V-shape as shown. Once you are done, go to Edit> Define Brush

It asks to name the brush. Name the brush as Stitch.

5. Once you are done, select the previous file we were editing from the project bin. Select the brush tool and the brush style as Stitch from the Brush combo box in the top bar. Create a new blank layer from layer menu and name the layer as "Stich".

Now on the edges of the text, start stamping the brush as shown. Please note we are stamping only along the horizontol lines as shown.

6. For vertical lines rotate the file by 90 degrees from Image>Rotate menu and complete the bruh stamping along the vertical lines which now appear as horizontal plane after rotate.

Once done rotate the image back.
7. Now select the Stitch Layer and go to Enhance>Adjust Sharpness. Increase the amount and radius as necessary.

Click Ok.
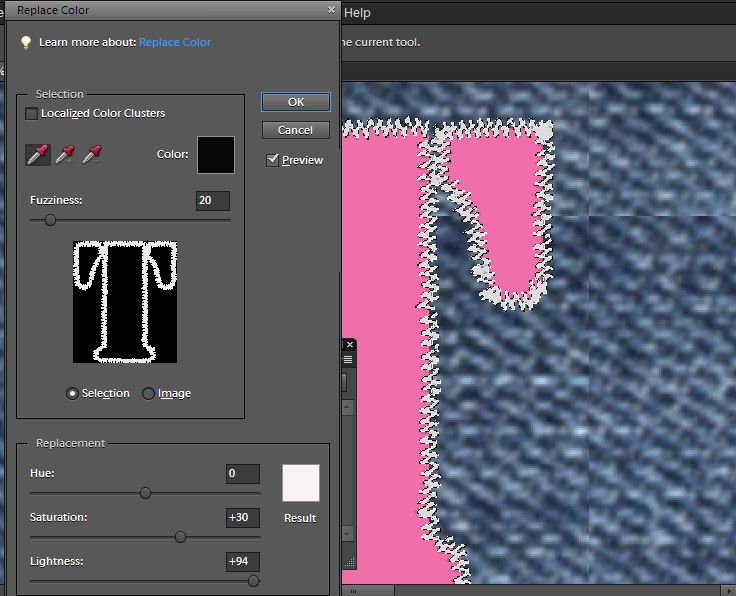
8. Now keeping the Stitch layer selected, Go to Enhance>Adjust color>Replace Color. Select the color of the stitching or embroidery if you dont like the black stitching. I changed it to off white from black.
9. Once done, keeping the same above layer selected, go to Layer>Layer Style. Add Bevel to it(approx 9px in size).

10. Click Ok. Here is how your embroidered/stitched style look like :

Hope you find this tutorial helpful !


This is a great tutorial. Thank you!
ReplyDeleteThanks for the nice words!
ReplyDeleteRegards,
Vaishali
THat is AWESOME!!! thanks so much for sharing!!!
ReplyDeleteI've long recommended that people seeking to have a very good understanding of this specific topic spread their research across several blogs so as not to deal with wrong information. You have provided so many areas for people like me to start with. But this can be puzzling for some. Let's take into account the only real enemy here's not being focused. This will happen to some. So my advice is: Stay focused. Thank you
ReplyDeletePlease visit http://clippingpathsource.com/ to know more about clipping path service.
I really like your works because of its uniqueness…wish have contact with you to learn more from your tutorials. Please keep it continue for help us.
ReplyDeleteWe are providing Clipping Path
It's a very useful and and informative blog post about creating stitching or embroidery.
ReplyDeleteclipping path service
Very effective tips again. Thanks
ReplyDeleteclipping path service
Raster To vector
ReplyDeleteمكافحة النمل الابيض
مكافحة النمل الابيض
مكافحة النمل الابيض
مكافحة النمل الابيض
مكافحة النمل الابيض
مكافحة النمل الابيض