There is a cool feature in PSE 9 called Photomerge Style Match. Using this feature, you can match the style of any photo and transfer that style to your picture. For example if I had shot a sunset one day at some place X and I wished if I could have a similar shot on place Y. But if for some reasons I could not get, PSE 9 will help me. I can give the same sunset effect to my second image in a simple steps using this feature.
So here was my picture that I took on a foggy day. The image looks very normal and unattractive.

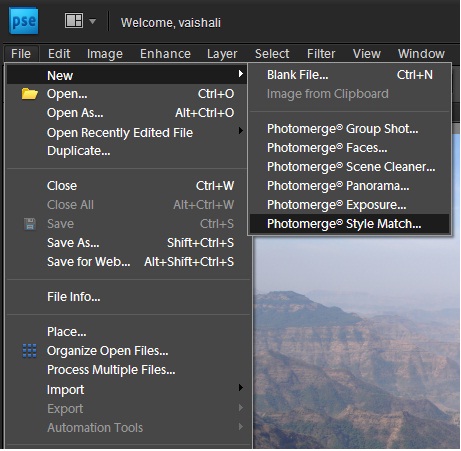
1. After opening the image in Editor, select New> Photomerge Style Match.
2. A new bin appears adjacent to project bin at the bottom called Style/bin. Style bin consists of few sample images as shown that can be used as source images to transfer their style to the your photo. You may add your own style images by clicking on the green + button in the style bin.

3. As you double click or drag any of the photos from the style bin to the blank placeholder above the project bin, the style will get applied to the image as shown with some default settings. I selected the default Sunset source image already existing in the style bin.

4. Now you can check the checkbox Transfer Tones to see how the image looks after the tones are transfered. You can play around with Style intensity, Style Clarity, Enhance Details, Soften stroke edges sliders to see the effect on your image.

The effects can come be really compelling if you try Style painter and Style Eraser tool buttons with different Opacity values( Opacity slider present on top tool bar) over different parts of image. So you may choose to erase style at some parts of image with 50% intensity while at other parts you may want to keep 100% of the effect.
Here is my final image after trying Style painter and Style Eraser with different Opacities at different parts of image :


It's always my pleasure to read this type of tutorial.I am very much interested in these types of topics and it's my habit to read and follow this.
ReplyDeleteWe are providing online image editing system > Clipping Path
Really it's a very wonderful and helpful tutorials all of us . I'm very glad to see. Thanks a lot for sharing this with us.
ReplyDeleteclipping path service
Thank You so much for this awesome guidelines. Do you know what is Raster to Vector conversion ?
ReplyDelete